Speed Up WordPress Site by These Easy Methods
Do you want to speed up your site? You are at the right palace. Today we are sharing everything about how to speed up WordPress site.
 The fast page loading site helps in SEO. Fast loading site improves user experience, reduce bounce rate, and help to gain more page views. So that’s we focus on speed up WordPress site.
In this post, I don’t want to tell you the old traditional way to improve your WordPress blog’s loading speed. Here I am sharing a special way that can really improve your WordPress site’s loading speed up to 10 times.
But before this, you just need to do some optimization in your WordPress sites. And also need to gain some basic knowledge because this information will help you later to learn what we are basically going to do.
Why Site Speed is Important
Everybody likes fast. If a site no open fast, the visiter moves away and the bounce rate will go up. If the bounce rate goes high then Google can remove your content from first. Because it thought that your site does not have good content that’s why the user doesn’t stay on it and also doesn’t like it.
So website speed is an important factor for SEO which can’t be ignored.
WordPress Site Types: Static or Dynamic
There are two types of WordPress sites, static and dynamic.
Static is called a site that is not regularly updated. For example a blog, small news sites, photography site, etc.
A dynamic site called that site which updates regularly. For example, an e-commerce site, a big news site, a social media site, a learning site.
So this trick is useful only for a static site and only for Cloudflare users. If your site is not using Cloudflare then this trick will not work.
So, before getting started, you need to do some changes to your WordPress site.
We have dived this tutorial of How To Speed Up WordPress Site into two sections. One is from your WordPress Dashboard and the other is from Cloudflare.
Speed Up WordPress Site by wp-admin
In this part, we will do all the changes in your WordPress dashboard(wp-admin). For a backup, please note all the current settings of your site or take a backup you of the site for the future.
1. Install a cache plugin
Cache plugin is the first step to improve the loading speed of your WordPress site. After enabling the cache plugin, this will create a cache file of the page and server it after every time to someone who visits on your site instead of serving the original page. This will reduce the load on your server.
So I strongly recommended you use a cache plugin on your WordPress site. Because the cache plugin improves loading speed and helps to deliver content faster.
There are three cache plugins which I suggest you use(only anyone) –
- WP Super Cache
- WP Total Cache
- WP Fastest Cache
All these three plugins are very popular and helpful in making the WordPress site faster. LiteSpeed Cache also a very recommended plugin for LiteSpeed Web Server. LiteSpeed server users can use this plugin.
2. Use Faster Web Hosting
Web Hosting matters in the site’s loading speed. if you are getting very slow speed then you can switch to another web hosting. If your site is getting huge traffic then you can upgrade your web hosting.
Here is the list of some best web hosting companies that provide the best web hosting in a reliable price.
3. Optimize Images
Unoptimized and big images can slow down your site. So you need to optimize your site’s images. Compressing images is one of the best solutions. After compressing the image, the quality of the image remains the same but the size of the image becomes less. So the image consumes less date while page loading and the page will load faster.
Manually optimize your site’s all image is very tough work. But some WordPress plugin helps to do it automatically. Here is some plugin that optimizes images files automatically.
- Short Pixel(free+paid)
- reSmush.it(free)
- WP Smush it(free+paid)
If you don’t want to pay money for it than you can use the free image compressing WordPress plugin reSmush.it.
4. HTML and CSS Minify
Optimizing and minifying HTML and CSS reduces the size of the web page and loads the page fast. Autoptimize is a better free WordPress Plugin for HTML and CSS Minify. This inline the CSS which increases the performance score.
Autoptimize plugin works well with WP Super Cache, HyperCache, Comet Cache, or KeyCDN’s Cache Enabler.
5. Disable Hot Linking
Some websites can use the image etc. of our site, which ruins the resources of our hosting and increases the load due to the server. For this, you should turn off Hot Linking.
You can disable hotlinking by just adding this code in .htaccess file
# BEING HotLink Protection

RewriteEngine on

RewriteCond %{HTTP_REFERER} !^$

RewriteCond %{HTTP_REFERER} !^http(s)?://(www.)?yourdomain.com [NC]

RewriteRule .(jpg|jpeg|png|gif)$ - [NC,F,L]

#END HotLink Protection
Note: In the above code, enter your website name instead of yourwebsite.com.
6. Use Cloudflare Full Page Cache
Cloudflare is a free CDN. This reduces loading speed and increases the security of the website. It provides an SSL certificate for free which makes your website secure, increases Google ranking.
Cloudflare also has paid plans for business and a very high traffic site. But the free plan has enough options for a WordPress blog site. Here we are using a free plan.
If you are not using Cloudflare CDN then this method will not work.
What we are going to do on
6.1 Add Site to Cloudflare
If you haven’t added your site to Cloudflare CDN then you add it before proceeding. If you have already activated Cloudflare then skip this step and go to the next step.
How to add a site to Cloudflare –
Step 1 – Sign Up on Cloudflare
Step 2 – Enter the domain name
Step 3 – Update Nameserver
(You can follow this link for more details on adding the site to Cloudflare)
It can take up to 48 hours. But most of the time it takes up to 1 hour so check back after some time.
6.2 Enable Full Page Cache
Basically Cloudflare caches only static files in its free plan, for example, CSS, javascript, and images. But after using this trick, Cloudflare will cache full page including HTML file, image, CSS, javascript, and everything on the page what it has. This will make your page load very faster like a rocket.
How to enable full page cache in Cloudflare –
Follow these steps to enable full page cache on Cloudflare –
6.2.1 Install ‘WP Cloudflare Super Page Cache’ Plugin on WordPress
I found a plugin that helps to work easily on WordPress. The plugin name is “WP Cloudflare Super Page Cache” and it is free available on the WordPress directory.
6.2.2 Get Cloudflare API Key
You need the Cloudflare API key to use this plugin. Without this API key, it won’t work. So follow these steps to get the API key –
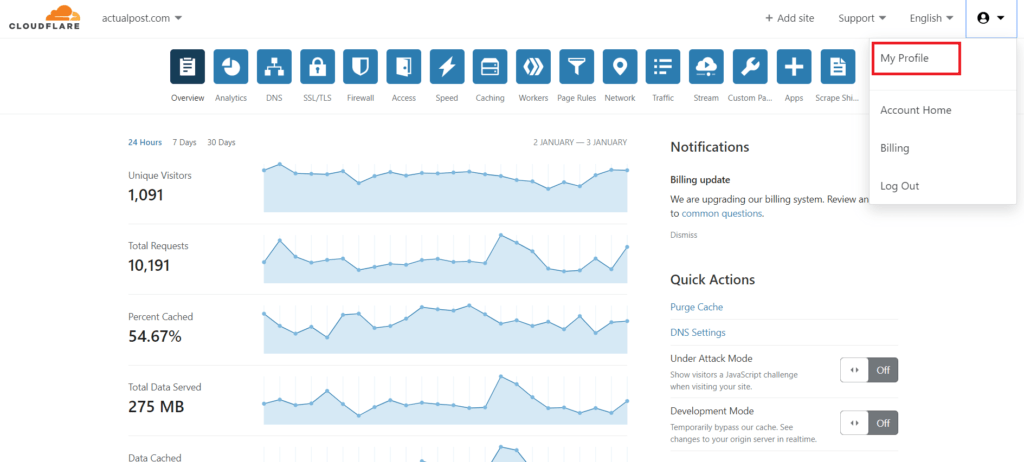
Step 1 – Log in to Cloudflare
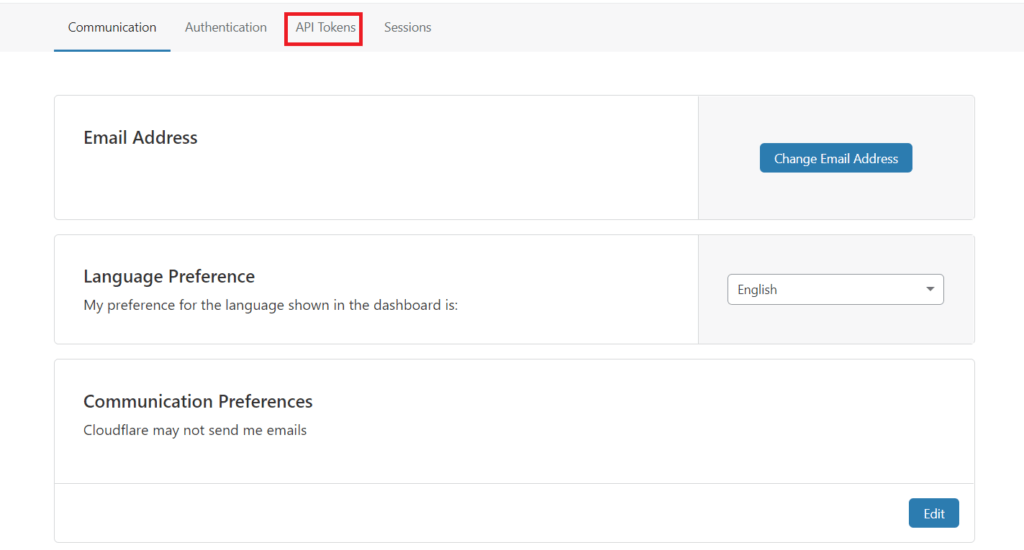
Step 2 – Go to ‘My Profile’
Step 3 – Go to ‘API Token’
Step 4 – Copy the ‘Global API Key’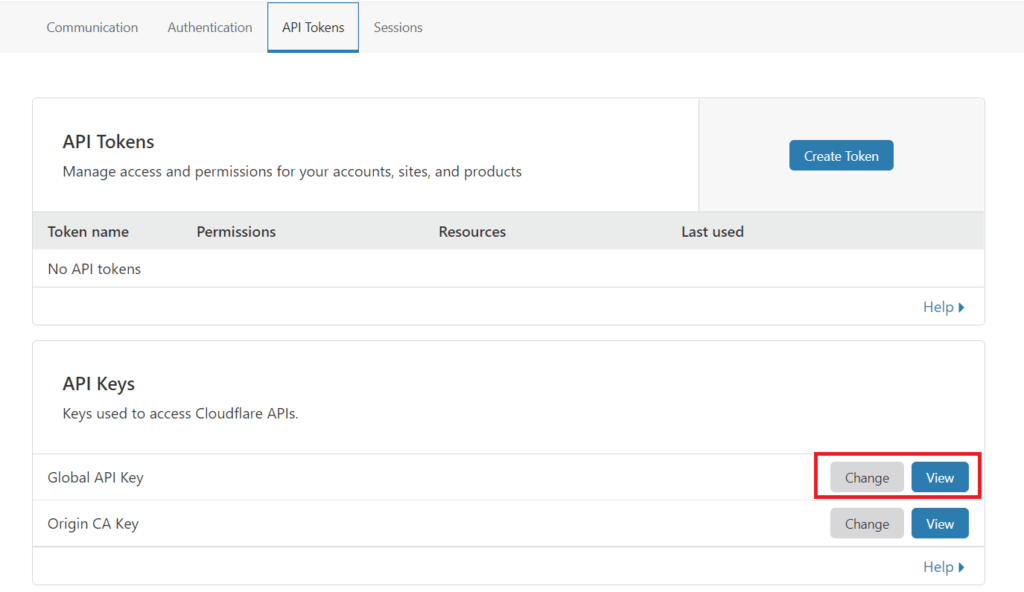
Keep this API safe, we need it in the next step.
6.2.3 Configure ‘WP Cloudflare Super Page Cache Plugin’
Step 1 – We installed this plugin before. So just activate this plugin from Plugins > Installed Plugins in the WordPress dashboard.
Step 2 – Go to Settings > WP Cloudflare Super Page Cache Plugin
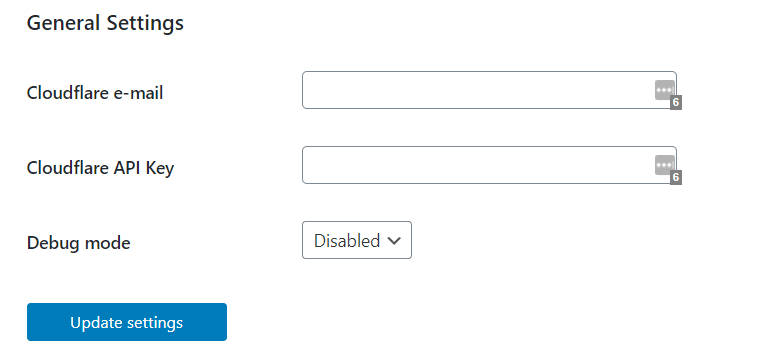
Step 3 – Enter the same email which you used to Sign up in Cloudflare and enter the Cloudflare API key. Now hit the ‘Save Settings’ button.
Step 4 – Now select the domain name of your current site, select the recommended option in ‘Don’t cache the following page types’ and save the settings
Step 5 – Now click on the ‘Enable Page Caching Now’ button.
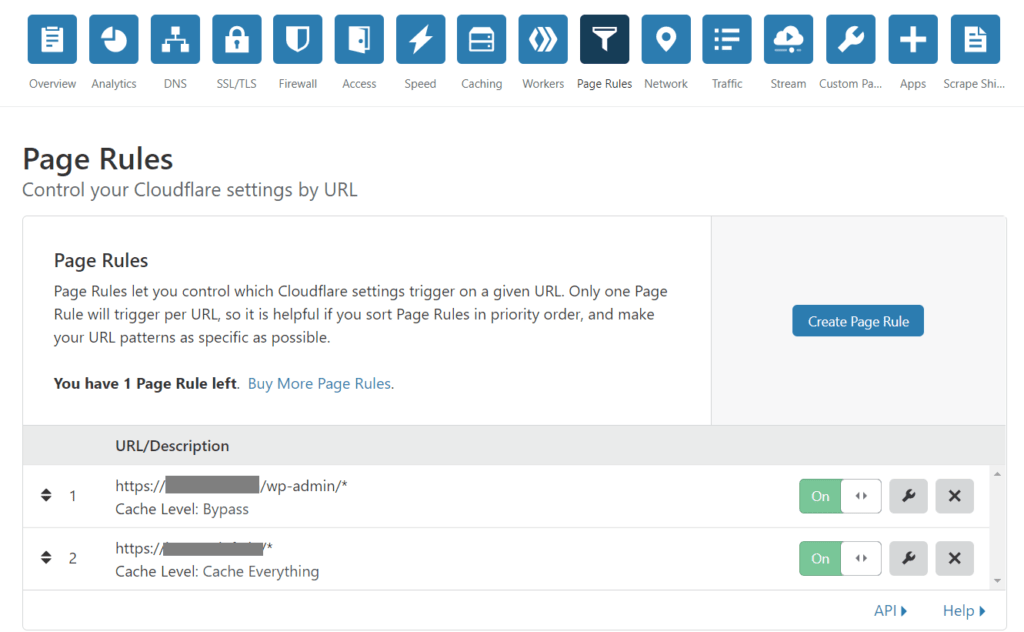
6.2.4 Add Page Rules in Cloudflare
Now one more last step remains in this process to speed up a WordPress site. We need to add a page rules in Cloudflare. Just follow these steps –
Step 1 – Login to the Cloudflare and select your site.
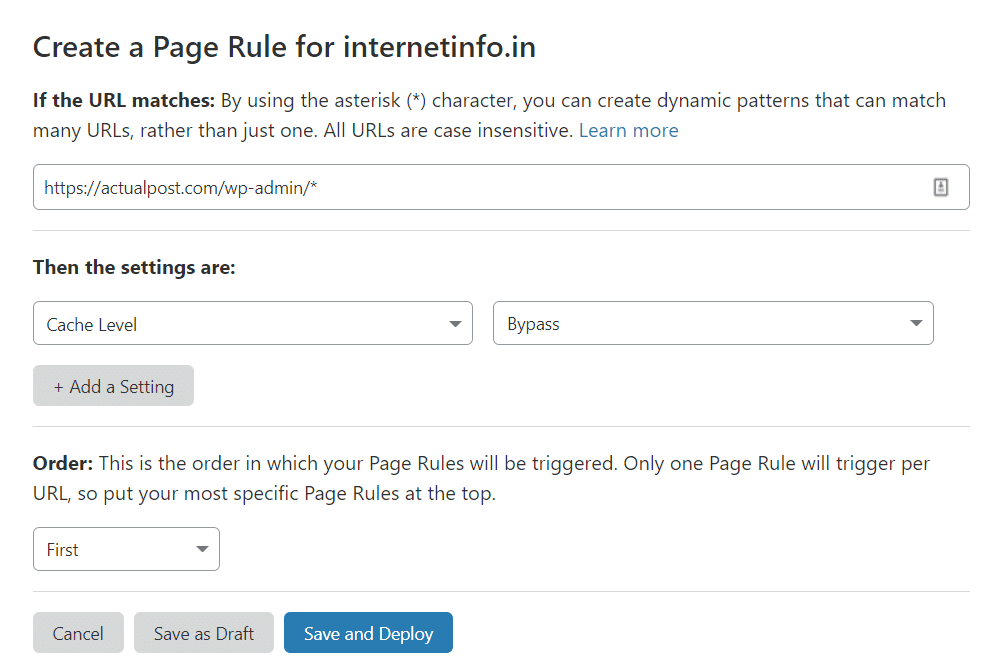
Step 2 – Go to the ‘Page Rules‘ and click on ‘create page rules‘.
Step 3 – Now enter below give values and click on ‘Save and Deploy‘
Everything is done. Now you clear the Cloudflare cache from Cloudflare dashboard > Caching > Purge Everything.
6.2.5 Testing the Cache
Now we are going to test to confirming everything is okay.
Step 1 – Go to Settings > WP Cloudflare Super Page Cache Plugin
Step 2 – Click on ‘Test Cache’
If the message is showing ‘Page caching is working properly’ then everything is okay and working. Now open your site in incognito. Now test your site in GTmetrix or ‘PageSpeed Insights’ several times. If not, then comment below. We will help you.
If you like this ‘Speed Up WordPress Site by These Easy Methods’ and found this helpful then don’t forget to share your views and thoughts in the comment box.
Hello Mukesh,
nice article! When using WP Cloudflare Super Page Cache you don’t need to create any additional page rules on Cloudflare. The plugin already excludes the backend from the Cloudflare’s cache 🙂
Bye
Thanks sir